beauty blogger

Sephora Collection Micellar Cleansing Milk – Review

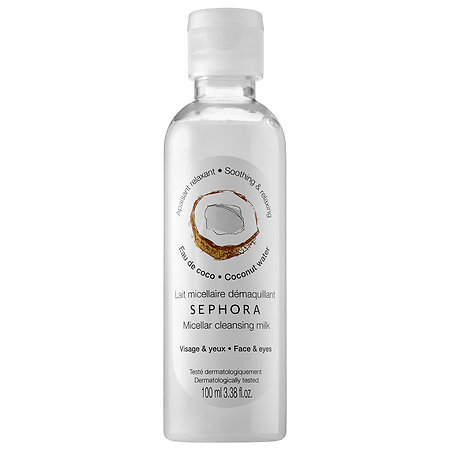
Welcome back to skin care Friday! This week I wanted to tell you guys about the Sephora Collection Micellar Cleansing Milk. I have the Coconut Water formula. You can find these online or in-store at Sephora for $7.50.

Sephora Micellar water

Somehow I randomly came across this item online. I remember I really wanted to get one of the those VIB freebies you get sent by email so I chose this (I know I’m not the only one guilty of this lol). These come in two different textures: milk or water and they have 4 different formulas catered to different skin types/concerns:

I love anything that has coconut water in it so thats why I chose it. These are perfect for traveling. I feel like I always say that… I guess I am a sucker for anything travel size. But in all seriousness, its always struggle finding good cleansers for traveling. You can see in the picture it’s kind of thick and has that milky texture. Best way to apply is on a cotton pad and gently work it into your skin. 

Micellar water cleansers are meant to take off makeup without having to wash your face. I feel like these have taken over face wipes recently. At least for me anyway… These claim to be able to remove face and eye makeup. I have to disagree on the eye makeup part. I tried it and it burned my eyes and didn’t remove any of my mascara. I recommend using an eye makeup remover regardless of what base makeup remover you use. As far as removing my face makeup, I feel like it did a great job. I did experience a soothing effect. I did however, feel like it left my face a little sticky. A quick rinse fixes this problem. If I am wearing a lot of makeup I will use a cleansing oil beforehand.

Overall I’d give this product a 4 out of 5. I’d say it’s worth trying out. My favorite thing about this product is that they cater to all skin types. If you have super oily skin, the Green Tea one may be a great option for you. The price is a little bit higher than drugstore versions especially for only 3.38 fl. oz. The Garnier SkinActive Micellar Cleansing Water is $4 for the same size. I’ve never tried it but its def on my list! I’ve seen it at Ulta. 

Thanks for reading! Stay tuned for next week’s skin care item!

XO, Diana

Boscia Tsubaki Oil Deep Hydration Hydrogel Mask- Review

Welcome to skin care Friday! I want to start a series reviewing only skin care. I have so many skin care products and instead of just talking about my favorites, I want to review ALL of the products I own and try out. I love all skin care- face masks, moisturizers, oils, toners, you name it!

Right now I am really into sheet masks. I currently have about 15. This week I tried the Boscia Tsubaki Oil Hydrating Hydrogel Mask. I personally have never tried any products from their Tsubaki Oil line but I know it’s great for dry skin.

You can find sheet masks anywhere nowadays. They can range from $3 to $25. I purchased this one at Sephora for $8. I love sheet masks because they are so affordable and provide great skin care benefits.

IMG_0844.jpg

This mask claims to replenish, soften, and deeply hydrate the skin.

IMG_0843

The mask comes with two pieces and has a gel consistency. After trying this, I realized I prefer gel masks over the cotton ones. This one felt sooooooooo good on the skin. The only thing that’s annoying is that it is a little difficult to take out of the package and put on the face. Once its on, it molds really well to the face.

The instructions say to leave it on for 20 minutes. I think I left it for about 30. What I noticed about this mask is that my face absorbed the essence completely. I don’t really notice that with other masks. There was not much left on the skin after I took the mask off. The mask did exactly what it claims. The next day I woke up to soft dewy skin. It also got rid of the dryness I have around my nose.

Overall, I’d give this mask a 5 out of 5. I think it’s great for any skin types as well. This mask is great if you are looking for something to soothe and hydrate your skin. Def try this if you feel like pampering yourself. I personally do it every Sunday evening.

Here is a really awkward selfie. hehe. I just really wanted you to be able to see the mask in action.

IMG_0845


Stay tuned for next week’s review! Thanks for reading!

XO, Diana

Bite Beauty The Lip Pencil- Review

img_0432

I was so excited to receive this VoxBox from Influenster. I love lip liners just as much as I love lipsticks. These are available to purchase at Sephora for $18. They have 22 shades available. I received 020 Beige Nude and 044 Rich Mahogany. I have also been wanting to try the Amuse Bouche lipsticks. The lipsticks I received are Whiskey and Honeycomb.

img_0431

fullsizerender

Whiskey, 044, 020, Honeycomb

I love Bite Beauty and what they stand for. I knew these products weren’t going to disappoint. My favorite items from the brand so far are the Agave Lip Mask (I have original and champagne) and the Matte Creme Lip Crayons.

The packaging is super basic. Requires a sharpener. No biggie.

img_0429

Some of my favorite lip pencils are MAC Cosmetics and the NARS Velvet Lip Liners. Both of these brands are matte, so they have a thicker formula, and they’re a little tougher to apply. These from Bite Beauty are different. I gotta admit I am super impressed with these. They are super soft and creamy.  However, because of the creamy formula, it causes them not to last as long as the ones I mentioned. You’ll get a full 4 hours of wear using it alone without eating or drinking much. You will definitely have to reapply after a full meal. The best thing about these is that they are easy to apply and they are great to wear alone. They apply very evenly. In the picture below, I am only wearing Rich Mahogany. As you can see the color is very opaque. I’d say the finish is a semi matte. It feels very comfortable on the lips.
img_0732

In the following picture I am wearing both the lip pencil in Beige Nude and Honeycomb lipstick. The lipsticks are just as impressive. Very opaque and creamy. I have been on a nude lipstick kick lately- this combo is being added to the favorites. I also like to wear the Beige Nude liner with a simple gloss on top.
img_0567

Thanks to Influenster for sending me this box try!  I definitely want to purchase some. I have my eyes on Mauve Brown.

Thanks for reading!

XO, Diana


Kat Von D Lock-It Setting Powder vs Laura Mercier Translucent Loose Setting Powder

I’m back with another review. Today I’m comparing the new Kat Von D Setting Powder to the super popular Laura Mercier Translucent Setting Powder. Both of these products are translucent once they are blended into the skin, so they are perfect for all skin shades.

FullSizeRender

I’ve had the KVD powder for a little over month now. This powder is described as, “A weightless translucent loose powder, formulated with Micro-Blurring Technology™, to set and perfect for a flawless, locked-in finish.” The product is very much what the description says.

IMG_5087

Price:

I purchased the Kat Von D powder at Sephora for $30. The LM powder is a little more expensive for $38. However, you do get a little more product in the LM, 1.0oz. The KVD contains 0.67oz.

Packaging:

Kat Von D’s packaging NEVER fails. She always has the coolest designs on her packaging. Overall the packaging is pretty similar. They both have a screw on lid. Sometimes the KVD lid can be a little tricky to screw on. I think it’s because the jar is made out of pretty durable acrylic. Both products are easy to spill on lid to dip your brush or sponge.

Texture:

They are both pretty finely milled but I think the KVD may be even a little bit more finely milled. The LM looks like it’s a tad bit more yellow. If you look closely in the KVD you can see tiny shimmery particles. When swatched it looks like it has more of a silky finish. The LM looks a bit chalky when swatched and compared to the KVD.

IMG_5096

Left LM, Right KVD

Application:

I usually only set my under eye area with powder. I prefer to use my beauty blender when doing so. If I apply on other areas of my face then I use a fluffy brush and gently dust on face. In the picture below, I am wearing KVD on the left and LM on the right. As you can see they have a very similar finish. They both also blend into the skin very well. I have not experienced a white cast in flash photography with either of these products. Also, neither one of these oxidize or alter the color of your foundation.

IMG_5051

The biggest difference in these is that the LM clings on to dry areas. Since I have dry skin, I have definitely experienced this before. For that reason I cannot use the LM in the winter. KVD on the other hand doesn’t really do that. The picture below is close up and unedited. You can clearly see the right side looks a bit more dry/crusty than the left side.

IMG_4728

Left KVD, Right LM

Overall:

I personally prefer the KVD because I have dry skin. If you already own LM then you don’t need to purchase the KVD unless you have super dry skin. If you don’t own either, I think I’d still go with KVD because of the texture and satin finish. The LM is definitely more matte so if thats what you like then go with that one.

Processed with VSCO with hb2 preset

I love camo… can you tell?

The KVD is also great for everyday use. I used the Erborian BB creme in the picture above. I also used the new KVD concealer. That review will be up next.

Thanks for reading!

XO, Diana


Cover FX Custom Enhancer Drops- Review

Hello, my loves! I’m back with another review. I’m sure you’ve all seen or heard about the new Cover FX Custom Enhancer Drops. I’ve had mine for about a month now. They have been out of stock at Sephora for a while, but they are finally back in stock!

IMG_4998

These retail for $42. The price is a bit hefty for 0.5oz. They are available in 6 different shades. I believe they have four highlight shades and two bronze shades. I have the shade Sunlight. I would say this shade is like a metallic medium gold. These things are SO crazy pigmented. All you need is 1 drop.

There are several ways to use this. My personal favorite is mixing 1 drop to my foundation for dewy look. I also like using it as a highlight. One of the best things about this is being able to  use it on top of powder. It does not get cakey at all. You could also mix it with your moisturizer on a no makeup day to add a little glow to your skin. You can see in the pic below once it’s sheered out, it gives a nice subtle glow. I used only one pump for the swatch.

Let’s talk about the application… I feel like it was a little difficult to apply at first. It dries super fast so you have little time to apply. The good thing is that once it’s dry, it’s not going anywhere. Even on the hottest day. I’ve tried applying it with my finger and using a small stipple brush (by E.L.F). I think I prefer using the brush. I apply a drop on the back of my hand and then blend my brush in circular motions. I then apply it on my cheekbones and other areas I want to highlight. I do these steps as fast as I can to make sure it blends well. If I want a stronger highlight, then I use my finger to dab more on those specific areas.

IMG_4999

In the picture, I mixed one drop with my Erborian BB Creme. For my undereyes, I used the new Kat Von D concealer and loose powder (review coming soon). I used the drops for my highlight as well. I did not apply a highlighting powder on top.

Overall, this is a beautiful product. It’s very versatile and there isn’t any other product on the market out there. The only thing I dislike about this product is the price tag. Other than that, I would absolutely recommend to everyone. So, if you are a lover of highlights and if you loving glowing like JLO 24/7, then go pick one of these up ASAP.

Thanks for reading!

XO, Diana


Too Faced Melted Matte Liquified Lipstick Review- Queen B


I’m back with another liquid lipstick review. This time around I’m reviewing the newish Too Faced liquid lipsticks. I was lucky enough to pick up Queen B in store at Sephora. I think this is one of their most popular shades and I can totally see why because it’s beautiful! I’m currently obsessed with nudes and mauves so of course I had to get this one.

IMG_4424.jpg

You can purchase these at the price of $21. This shade is always out of stock everywhere, but it’s currently in stock at Ulta.com. I LOVE this packaging. It’s very different from the typical liquid lipstick packaging.

IMG_3070
Queen B is described as a “matte soft mauve.” This has a slight warm undertone. It has the perfect amount of pink and mauve. The closest colors I have to this are Dose of Colors Stone ($18+ shipping) and Kat Von D Lovecraft ($21). You can check out the comparison below.

IMG_4419.jpg

Queen B, Stone, Lovecraft 

I like this formula because it is light and comfortable. It’s less drying than KVD.  I’d say it lasted on me for about a good 6 hours. I found this really easy to apply.  The applicator is very similar to the Kat Von D liquid lipsticks. I also didn’t noticing any transferring.

IMG_4404

Based off of this lipstick only I can say I really like these lipsticks. I would definitely recommend trying at least one. I’m curious as to how the brighter and darker shades wear. I have my eyes on Mrs. Roper and Naughty by Nature. I will update you guys once I try those shades.

XO, Diana


Becca X Jaclyn Hill Champagne Collection Face Palette

A few days ago I happened to be scrolling through Instagram at the perfect time. Sephora had a pre-sale for the Becca X Jaclyn Hill Champagne Collection Face Palette. I believe it was up for about an hour before it sold out. The palette along with the rest of the collection will be available online 5/26 at 9am PST and in stores on 6/16.

IMG_3232

Packaging– Beautiful, very elegant. It reminds me of YSL because of the gold. It’s also very sturdy. It’s about the size of my hand. I think the size is perfect, especially the mirror inside. It is a little bit thicker than I’d like, but I still love it.

IMG_3235

The palette comes with two highlights in Champagne Pop and Proseco Pop (.19oz), a luminous blush in Rose Spritz (.10oz), and two mineral blushes in Amaretto and Pamplemousse (.12oz). When comparing these to the full size, you get about half of the amount. The cost of this palette is $52. On the website it has the value at $136, but if you are only getting half of the amount the value should be around $70.

Highlights

Champagne Pop is the only permanent shade included. I purchased this highlight when it was first released. Champagne Pop is considered a “soft white gold with a peachy pink undertone.” I’d really recommend this palette if you don’t already own this highlight.

Proseco Pop is a medium warm gold. On the website it states this highlight was inspired by “liquid gold.” I would definitely agree. This shade is beautiful! I love gold highlights. I think this palette is worth purchasing just for this highlight. You can see in the picture below its very gold. The other highlights have more of a bronzey tone.

FullSizeRender copy 2

Left to Right: Proseco, Laura Geller  Gilded Honey, MUFE Pro-Sculpting Duo 2, MAC Oh Darling 


Blushes

Rose Spritz is a beautiful peachy pink with pale gold shimmer. I’ve been wanting to try out the luminous blushes since they first came out, so I was really excited one was included in this palette. This blush gives such a beautiful glow. It also blends beautifully with the highlights.

Amaretto is a mineral blush described as a “toasted almond.” I think this could be used as a bronzer if you have lighter skin. I would use this as an everyday blush on its own with no bronzer.

Pamplemousse is a super bright coral pink. This shade is perfect for a nice pop of color on the cheeks. I love their mineral blushes. They are very pigmented. Matte blushes can sometimes be blotchy but not these. Nope!

IMG_3236

L to R: Champagne Pop, Proseco Pop, Rose Spritz, Amaretto, Pamplemousse

I love this palette because all of the shades are so pigmented. To be honest, I expected nothing less from Becca. All of their products are amazing and this palette is no different. I have been a lover of their highlights and blushes for a while now. I think $52 for five Becca products is worth it.

I don’t have very many blushes so it justified my purchase a little bit more. I do have a lot of highlights, but lets be real, is there really such a thing as too many highlights? Never! I’d def recommend this palette based on the quality and the shades. I think the shades are suitable for all skin types. This palette would have been even better if it included a bronzer (or if Amaretto was a bit darker). But I still think it’s a great palette to travel with. Mine came just in time for my trip to Mexico!

IMG_3229

I used Amaretto and Rose Spritz as my blush and Proseco as highlight

I hope this gave you an idea of what to expect from this palette. I don’t think it’s an absolute must have, but it is a nice palette to have in your collection, especially if you are a makeup artist. Let me know if you plan on purchasing!

XO, Diana

Favorite Eye Brushes

I previously did a post on my favorite brushes for the face. Today I have for you my favorite brushes for the eyes. If you didn’t get a chance to read the first one, you can check it out here.

The majority of my eye brushes consist of Sigma. I purchased my first set over 5 years ago and they are still in great condition. I know there a lot more brands out there like Morphe. I’m sure they have a dupe for all of the brushes I’m going to list.

Sigma E40 Tapered Blending

E40

I’m starting off with my favorite brush of all time. I always start with this brush when doing my eyes. It’s perfect for blending the crease. I like to use this especially on days I don’t really feel like doing much. I like to use it with bronzer. All I do is dip it in the bronzer and go back and forth in the crease. It’s so easy to do! If I have more time I add a wing liner.

Real Techniques Setting

setting brush

I mentioned this brush in my other post, but I also like this brush for the eyes. I use it to set my primer and I also like it to use it to blend above my crease once I’m finished with my eyeshadow.

Sigma E35 Tapered Blending

E35

Another blending brush… This very similar to the E40 except it’s a little smaller. I like to use it to blend out darker colors.

Sigma E45 Small Tapered Blending

E45

This brush is great for adding depth to your look. It allows you to get very precise, but also blends at the same time.

Sigma F75 Concealer

F75

I love this brush because it serves many different purposes. It’s great to apply eye primer and cleaning up my winged liner. I also like to use this wet to apply glitters, loose shadow, or foiled eyeshadow (Makeup Geek).

Angled Liner Brush & Small Dense Brush


IMG_2939

These two brushes aren’t available but I wanted to give them a shoutout. I received these brushes in an Ipsy bag yearrrrrrrs ago. It was when the My Glam bags had just started out around 2012. I like the liner brush because it is very thin. I love using this to apply liner with eyeshadow.  The Sigma E06 looks like it would be great and it has pretty good reviews. The small dense brush is good to use to blend out the lower lash line. It’s also great to highlight the inner corner. The Morphe B16 looks very similar and it’s only $2!

I hope you’ve enjoyed. Thanks for reading!

XO, Diana


Jeffree Star Velour Liquid Lipstick Review

As you all know liquid lipsticks are my friggin jam. I’m excited to share these with you. I own two shades: Unicorn Blood and Masochist.

IMG_2550.jpgFirst, can we talk about the packaging??? LOVE! I think these liquid lipsticks have the best packaging. I mean, who doesn’t love pink and rose gold? The container itself is excellent quality, very sturdy. The price is average, similar to others at $18.

Now we can talk about the formula. I love these because they super pigmented and opaque, and matte of course. They also aren’t as drying as other liquid lipsticks, you can still feel the moisture on your lips.They last for hourrrrsss, even after eating greasy wings. They also do not feather so a lip liner is not needed.

Now on to what I don’t like… They are a little sticky. I have the habit of closing my lips together, and it really bothers me when my lips stick together. They also transfer a little bit at first. I’d suggest blotting your lips until the transferring stops. Masochist definitely has a thicker formula than Unicorn Blood. That one is pretty watery.

IMG_2487

Lets go back to the packaging for a bit. It has the normal doe foot applicator. However, the applicator on these lipsticks are bigger than normal. So this causes the wand to pick up a lot of product. They are also fuzzier (if that makes any sense). It makes it difficult to get that precision.  Both of the lipsticks I own have the fuzziness, especially at the very tip. I have to use a lip brush to get a perfect application. First, I use a lip brush to line my lips. Then, I use the applicator to finish applying. I tend to go back with a lip brush to blend it all out. You can see in the picture below where I compare it to another lipstick.

IMG_2551

Left: Kat Von D, Right: Jefree Star

Masochist:

IMG_2534
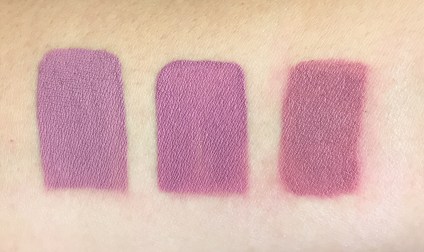
This color is what let me to make a purchase to begin with (not the name, I hate the name). It’s a beautiful medium bright pink. Like a raspberry shade. I love colors like this. They are my favorite kind of pinks to wear.

Unicorn Blood:

IMG_2547I purchased these lipsticks last Fall so of course I had to buy a vampy shade. This one is a deep reddish brown. It’s a pretty shade to have if you don’t have anything like it! I don’t normally go for brown shades.

Processed with VSCO with hb1 preset

Overall, I’d rate these an 8 out of 10. These lipsticks would be perfect if they were easier to apply and less sticky. I definitely recommend using a lip brush to apply. I’m sure all of the other colors are just as beautiful and opaque. If you are a beginner at apply lipsticks, these may be a challenge for you. Using a lip brush can be a bit challenging as well, but it’s easier than what you get in these. I’m dying to purchase Androgyny and Gemini.

Thanks for reading!

XO, Diana

Disneyland Adventures 

IMG_1823

The Happiest Place on Earth

Hey everyone! I wanted to give a quick recap on my awesome trip to Disneyland. My little sister and I went to celebrate her 15th birthday. We had such a blast! I thought my outfits and makeup were worthy of a blog post.

It was a really fun short trip. We went to both Disneyland Parks the first two days and Newport Beach on the 3rd. I thought I would share a few pictures of my outfits and makeup.

Processed with VSCOcam with hb1 preset

We had a 6am flight so we decided to just get ready at the airport when we arrived.

Denim shirt: Marshalls

T-shirt: Madewell (new favorite tshirts)

Shorts: Target (old)

Shoes: Birkenstock, Amazon

Necklaces: Forever 21

Watch: Marc Jacobs
IMG_1783

I really enjoyed my makeup this day! I went with bronze-y eyeshadow and eyeliner. I also really wanted to mention this new lipstick. It’s from the UD Gwen Stefani Collection. I’ve always loved Gwen’s signature red lip, so when I saw this in store I knew I had to have it.

Face and Eyes: Chanel Vita Lumiere Aqua foundation, Too Faced Chocolate bronzer, Becca Wild Honey blush, MUFE Pro Sculpting Duo 2 (eyes and cheeks), KVD tattoo liner.

Lips: MUFE 8C lip liner, UD Gwen 714 lipstick. The lipstick has a super matte texture. It reminds me of the MAC retro matte finish. It’s kind of tough to apply but it does last all day.

IMG_2075

How cute is my sister?!

Processed with VSCOcam with hb2 preset
I loved my outfit this day! It was St. Patrick’s Day and I didn’t have any bright green, so I went with the next best thing, olive. Almost everything is from Forever 21.

Camo shirt: Forever 21, Similar

T-shirt dress: Forever 21

Necklace: Forever 21

Sunglasses: Amazon

Shoes: Nike

I pretty much did the same makeup look this day. I used Dose of Colors Truffle on my lips.

I didn’t take many pictures on the last day. I just leave you with this pretty picture of Newport Beach.

IMG_1935.jpg